Setup and Installation
If you currently run your site based on Elevated-X CMS (using php templates), it is rather easy to integrate it with Xvid MediaHub. We can:
- Automatically convert new video into multiple resolutions using the Xvid MediaHub transcoder service to prepare a new Elevated-X content set.
- Accelerate video delivery using the fast Xvid MediaHub CDN service.
- Protect all video in the content set with Xvid AutoGraph watermarking.
So let's start with setting up the necessary pieces...
Step 1: Create an application to use with your site in your Xvid MediaHub account
An application sets up a set of alternative "login" credentials allowing you to delegate API access under your account to one (or more) applications (e.g. a script, your website, etc.). This way you don't need to leak your actual username and password into an application config file and you can also at any time disable API access of a certain application or re-create the entire application with new credentials in case an app got compromised or insecure without harming your overall account or any other app in your account.
So let's switch to the "Apps" tab and click "Add App", then enter a name for your new app and click "Create" (you can just leave the "CNAME Alias" field blank):

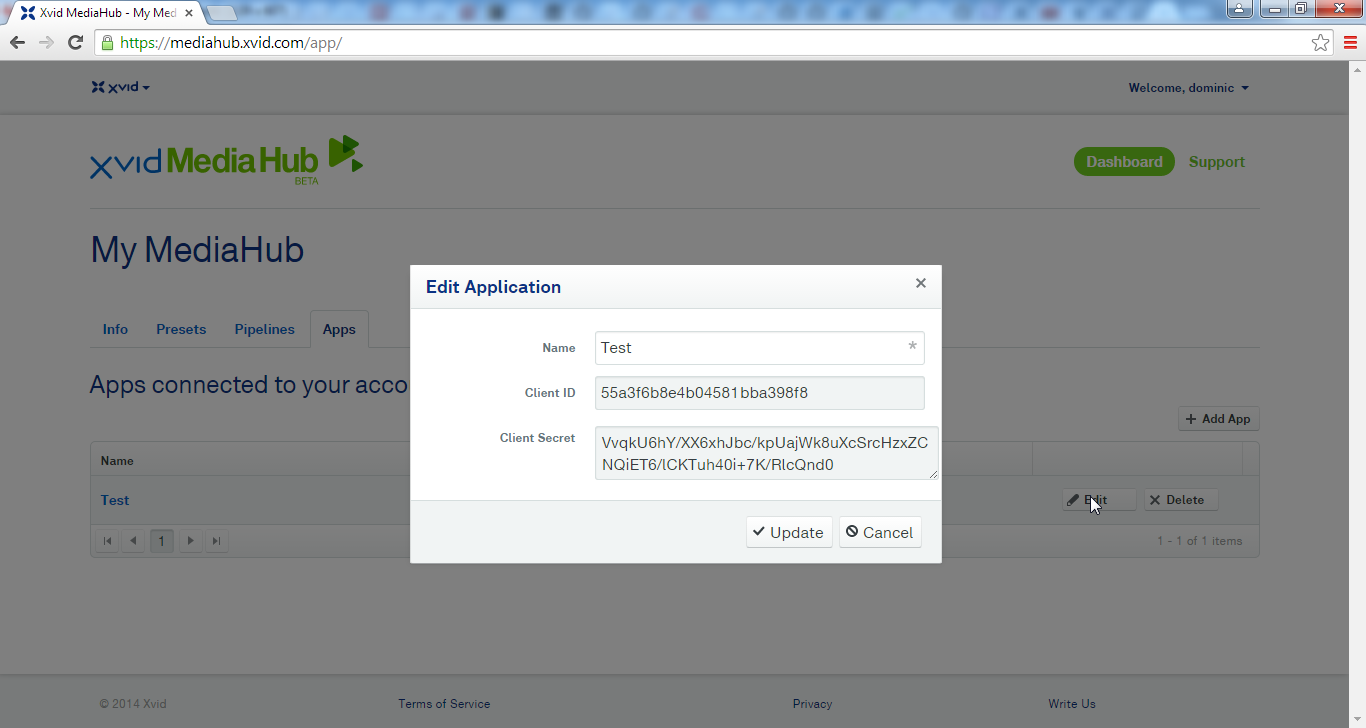
The newly created app will now show up in the grid. To obtain the corresponding application credentials, click on the "Edit" button. From the popup-window, copy&paste your Client ID and Client Secret. We'll need them in the next step:
Step 2: Create two new FTP accounts to be used as the input and output locations for the Xvid MediaHub transcoder service
- The two FTP accounts should have working directories that are not served as part of your website! So the FTP homes should not be under your '
public_html' site root! - Also, since the FTP login credentials will be posted to your Xvid MediaHub account, it is best from a security point-of-view that the FTP accounts really give access to just a fresh, empty home directory (and not to your entire website's content or even your entire user's home directory...)
- As part of this tutorial, we create a new directory
'/home/nerds4nerds/xvid_input/'as the input dir and'/home/nerds4nerds/xvid_output'as output. So we e.g. in CPanel create a new FTP user 'xvid_input' that can read/write to the '/home/nerds4nerds/xvid_input/' and a second FTP user 'xvid_output' that can read/write to '/home/nerds4nerds/xvid_output/'. - Make sure that your webserver user (so the user under which your php scripts run) has also write access to the '
xvid_output' FTP account folder (and can also write to files that were created by the FTP user - so check your FTP server default permissions for new files! Or, if in doubt, make sure that the FTP accounts run under the same user id than your webserver). - If your hoster needs to restrict access to the FTP to a certain pool of IP addresses, please make sure to whitelist the following three IP ranges:
149.202.180.0/23
135.125.78.0/27
54.39.47.96/27
Step 3: Download and install the Xvid MediaHub Elevated-X integration files
- Get the necessary script as a zip file here: xvid_mediahub_elevatedx.zip
- Extract the zip and copy the file '
ping.php'into your site's root folder (typically, named 'public_html'or similar). If you're running Elevated-X in a multi-site configuration, copy the ping.php into the root of each subsite that you want to integrate with Xvid MediaHub. - Trigger the installation of the script by invoking the script from your browser, so e.g. enter '
http://mysite.com/ping.php' in your browser's address bar.
Note: The script will prepare a few files, so make sure the script (and the webserver user under which the script is executed) has write access to the following locations within your Elevated-X installation:./cms_admin/xvid/*
./cms_admin/phptemplate/*/functions/cdn_hook.tpl
./cms_admin/phptemplate/*/functions/backup/cdn_hook.tpl.bak
./members/cmsinclude.ini.php - If all goes well, you should see a "
Installation complete!" text in your browser.
Note: During the installation, theping.phpscript adds code into yourcdn_hook.tpltemplate file(s) (typically located at: 'public_html/cms_admin/phptemplate/site0/functions/cdn_hook.tpl').The original, unmodified cdn_hook.tpl is backed up to 'backup/cdn_hook.tpl.bak'under the same folder. If you notice any problems with your site after installation, restore your original 'cdn_hook.tpl'using this backup copy and contact our support.
Step 4: Configure Xvid MediaHub features in your Elevated-X site
Open the 'cmsinclude.ini.php' config file in your site (typically at 'public_html/members/cmsinclude.ini.php'). During the script installation, a new section "[xvid]" is already added with some default settings. It should typically look like this:
cmsinclude.ini.php
[xvid]
ENABLE_MEDIAHUB_CDN_AND_AUTOGRAPH = 1
CDN_BASE_URL = "https://api.xvid.com"

APP_CLIENT_ID = ""     ;<--- Put your application Client ID here
APP_CLIENT_SECRET = "" ;<--- Put your application Client Secret here

NOTIFICATION_EMAIL = "" ;<-- Put your email address here

INPUT_DOWNLOAD_ROOT_DIR = "/home/nerds4nerds/xvid_input/" ; <--- Put the path to the FTP input folder here
OUTPUT_UPLOAD_ROOT_DIR = "/home/nerds4nerds/xvid_output/" ; <--- Put the path to the FTP output folder here
ELEVATEDX_UPLOAD_ROOT_DIR = "/home/nerds4nerds/public_html/members/content/upload/"

USERNAMES_ARE_CASE_SENSITIVE = 0
PREVENT_LINK_SHARING = 1
EXCLUDE_USERS_FROM_LINK_SHARING_PROTECTION = "testuser1,testuser2" ; <-- comma-separated list of usernames
SET_CHMOD_PERMISSIONS = 755
LOGFILE_PATH = "/home/nerds4nerds/public_html/cms_admin/xvid/xvid.log"
DBFILE_PATH = "/home/nerds4nerds/public_html/cms_admin/xvid/xvid.db"

;MYSQL_HOST = "127.0.0.1" ; <--- If you have a MySQL database, you can configure the access details here
;MYSQL_DB = "xvid"        ; By default, the MYSQL options are commented out and a local SQLite database is used then
;MYSQL_USER = "xvid"
;MYSQL_PWD = "password"

FORCE_UPDATE_TOKEN = "SUBX5K7_zJfPIyxGyBHGY5ySUbVUmL" ; <--- Trigger update by invoking: http://yourdomain.com/ping.php?force_update=FORCE_UPDATE_TOKEN
Make sure that you:
- Update INPUT_DOWNLOAD_ROOT_DIR to the actual path of the 'xvid_input' directory you created as the working dir of your 'xvid_input' FTP account and OUTPUT_UPLOAD_ROOT_DIR to the path of the 'xvid_output' directory that you created as the working dir of the 'xvid_output' FTP account before.
- Set APP_CLIENT_ID and APP_CLIENT_SECRET to the application CLIENT_ID and CLIENT_SECRET you created in the previous Step 2.
- Update ELEVATEDX_UPLOAD_ROOT_DIR to the directory containing your content sets (usually, "$_SERVER[DOCUMENT_ROOT]/members/content/upload/" like in above defaults should be ok but if your Elevated-X content sets are somewhere else, you will need to adjust this option).
- The NOTIFICATION_EMAIL option allows you to specify an email address where to send a notification to when a new content set is prepared and ready. So if you like to receive such a notification, put your email address here. If you don't like to receive any notifications, you can comment out this line (by preceding the line with a ';' semicolon) or set it to an empty string.
- The USERNAMES_ARE_CASE_SENSITIVE option allows you to indicate whether usernames to log in to your site are case sensitive or not. If you use Apache HTTP Basic Authentication to protect your member area, usernames are case-sensitive. If you use some other authentication scheme it may be different.
- The defaults for the LOGFILE_PATH and DBFILE_PATH options are usually ok. But if you'd like to adjust them and have our script use a different folder for its application logs and internal DB, you can set it here. Ideally, the LOGFILE_PATH and DBFILE_PATH should not be served as part of your website, so should not be inside your "
public_html' directory (the default settings do put it there but we also place a .htaccess file during installation to prevent unauthorized access). Further, if you have installed Elevated-X in a multi-site configuration, the LOGFILE_PATH and DBFILE_PATH options should point to the same locations in the config of each sub-site.
Note: Please make sure that your webserver user (that's the context our script runs in) has full write access to the locations you have configued in the cmsinclude.ini.php. This in particular includes:
- INPUT_DOWNLOAD_ROOT_DIR/*
- OUTPUT_UPLOAD_ROOT_DIR/*
- ELEVATEDX_UPLOAD_ROOT_DIR/*
- LOGFILE_PATH
- DBFILE_PATH
MySQL: If you have a MySQL database you can optionally configure it so that MySQL will be used by the script instead of the default SQLite database. In order to use MySQL create a new database (e.g. 'xvid') and a new database user that has full access to this new 'xvid' db. Then uncomment the MYSQL_HOST, MYSQL_DB, MYSQL_USER and MYSQL_PWD options and set them to appropriate values.
Step 5: Create a custom Pipeline in your Xvid MediaHub account using your new 'xvid_input'/'xvid_output' FTP accounts
After logging on to the Xvid MediaHub web app, go to the "Pipelines" tab and click on the "Add New" button (refer to the below screenshot as an example). Make sure that you:
- Configure the newly created 'xvid_input' FTP account as "Input Download Directive" (select "FTP" as "Storage Type", then enter the hostname and user/pass of the FTP account)
- Configure the newly created 'xvid_output' FTP account as "Output Download Directive" (select "FTP" as "Storage Type", then enter the hostname and user/pass of the FTP account)
- Enable the "Auto-convert Input" option
- Configure the "Job Ping URLs" as 'http://' + your_website_domain_name + 'ping.php' (that's the URL of the ping.php script you're going to install in your site during Step 4). In our example here, it's: '
http://nerds4nerds.co/ping.php'

Step 6: Add a 'templates.json' file to your 'xvid_input' directory
The 'template.json' is a template file containing one or more job json objects. Every new video file you upload into the 'xvid_input' directory will be automatically processed as new input file by the Xvid MediaHub transcoder service according to the job options specified in the template. You will want to customize this according to your needs, in particular adjust to which output formats and resolutions you want to convert your video (with e.g. 480p and 720p resolution video in respective subfolders under the folder of your Elevated-X content set - note, if you have configured different subfolder names in Elevated-X to host the different resolutions of your video, you need to adjust the "output_name" fields in the templates.json accordingly). As a quick start, you can use the sample templates.json below (it has AutoGraph watermark protection enabled) and then customize it further:
templates.json
[{
    "template_name": "ElevatedX TEST",
    "match_pattern": "*.mp4",
    "client_id": "59f11566e4b09fef4358125e",
    "client_secret": "XXXXXXXXXXXXXXXXXXXXHpRrdQbMLtrRJp2OhvZ6ExQ",
    "jobs_to_run": [{
                        "autograph" : { "watermark_strength" : "light" },
                        "output_prefix" : "{input_name}/",
                        "outputs" : [ {
                                          "preset" : { "id" : "52a6bbdfa2ca79055aaa787a" },
                                          "output_name" : "480p/{input_name}_480p"
                                      },{
                                          "preset" : { "id" : "52a6bbdfa2ca79055aaa787a" },
                                          "output_name" : "720p/{input_name}_720p"
                                      }
                                    ]
                   }]
}]
Now that's all! From now, whenever you want to publish a new video title on your site and want it distributed with Xvid AutoGraph protection enabled, you just need to:
- Upload a high-quality, high-resolution master copy of your video into the '
xvid_input' directory. The video will then automatically be imported to Xvid MediaHub and converted to multiple output resolutions (480p, 720p, etc.) according to the options in templates.json. - Once the conversion is done, you'll receive an email notification. You can then log on to your Elevated-X cms_admin panel and publish your new content set as usual.
- All downloads as well as the streaming video in the video player will be automatically AutoGraph watermark-protected and served via the Xvid MediaHub CDN (that is as long as you have this feature enabled, so have 'ENABLE_MEDIAHUB_CDN_AND_AUTOGRAPH = 1' in your '
public_html/members/cmsinclude.ini.php'. If ever you don't like to distribute your video via the Xvid MediaHub CDN anymore, you can just set this config option to '0' and your videos will be served from your own server again. Note however that in this case also the Xvid AutoGraph watermark protection will not be functional anymore then).
Overview
Content Tools